Anomaly detection is an important technique in manufacturing, fraud detection, network security, finance, and healthcare. In this step-by-step tutorial, we will discuss a way to detect anomalies using Intel’s Anomalib.
What is Anomalib?
Anomalib is a deep-learning Python library designed to collect and benchmark state-of-the-art anomaly detection algorithms for both public and private datasets.
Some key features are :
- Python API and CLI available for model training, inference, and benchmarking
- Simple and modular API
- Models can be exported to OpenVINO for faster inference on Intel hardware
Let’s start by creating a Python virtual environment:
python -m venv envCopy the path to the activate.bat file in the env folder and run :
F:\demo\anomalydetection\env\Scripts\activate.batThe above command will activate the virtual environment
Now install the required Python dependencies by running the following commands:
pip install torch==2.2.2 --index-url https://download.pytorch.org/whl/cpu
pip install anomalib[full]==1.1.0
Now the development environment is ready.
Download MVTec anomaly detection dataset
We will use MVTec anomaly detection dataset. It contains different categories of images train and test data.
Download the full MVTec anomaly detection dataset.
You can read more about the MVTech anomaly detection data research paper here.
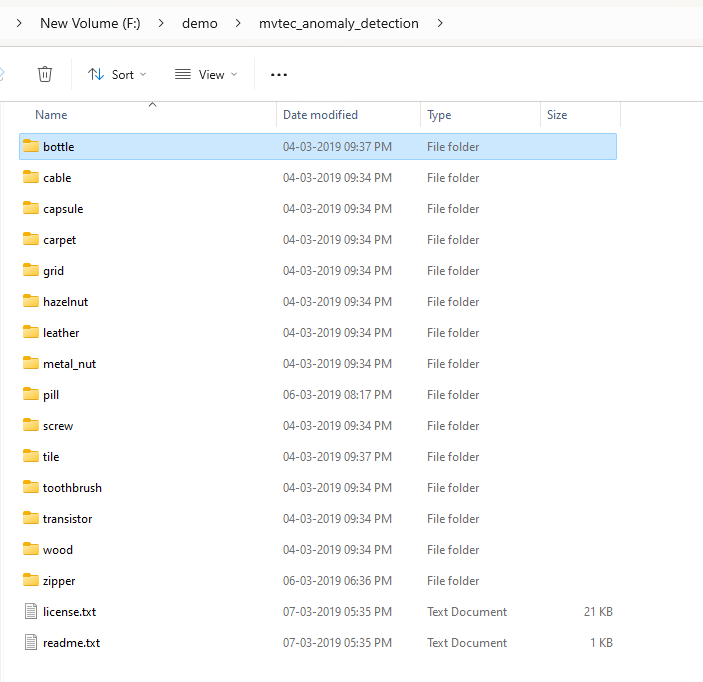
For this tutorial, we will use bottle data. The bottle folder has the following directories :
- train – This folder contains all good bottle images (209 images).
- test – This folder contains all good and defective bottle images (83 images).
- ground_truth – Contains segmented images
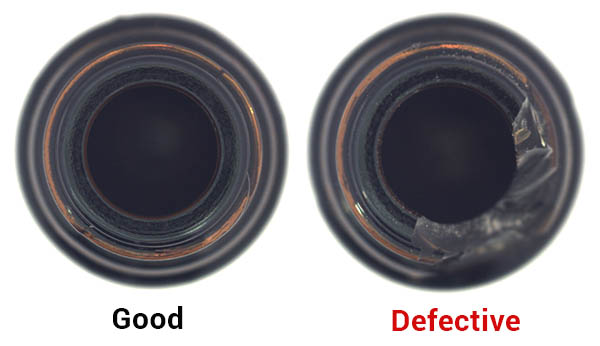
Let’s check good and defective bottle images.
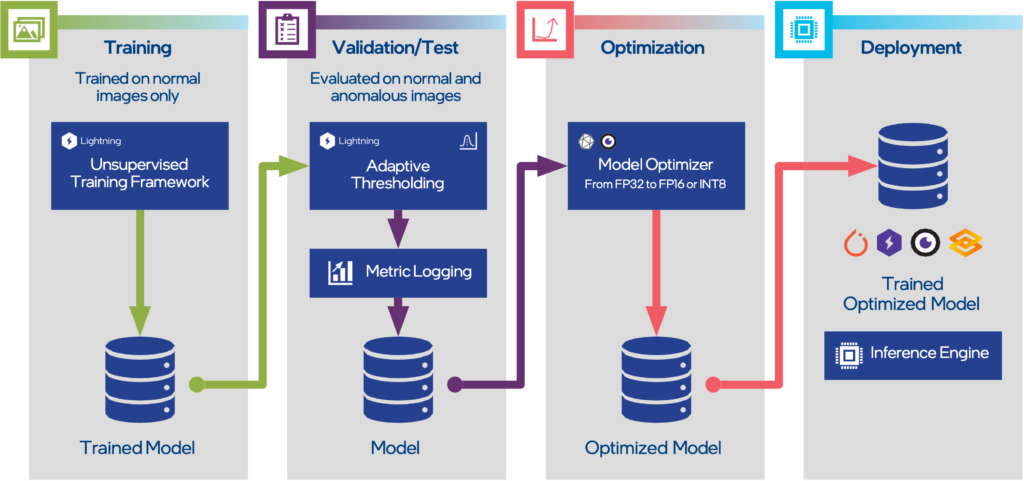
Workflow of Anomalib
The typical workflow of anomalib has the following steps :
- Training – Training the model to recognise the normal pattern.
- Validation/Test – Validating the model and metrics and testing model performance on the test dataset.
- Optimization (optional) – Optimizing model to an efficient form for example FP16 or int8.
- Deployment – The trained model can be deployed using tools Torch, Lightning, ONNX, OpenVINO, and Gradio.
Training
Data modules are responsible for providing the data for training, validation, and testing. We need to prepare a datamodule let’s initialize it.
datamodule = MVTec(
        root=r"F:\demo\mvtec_anomaly_detection",
        category="bottle",
        task=TaskType.CLASSIFICATION,
        val_split_mode=ValSplitMode.SYNTHETIC,  # synthetically generate validation data
        image_size=(256, 256),
        val_split_ratio=0.2,
        train_batch_size=32,
        eval_batch_size=32,
        num_workers=2,
    )
MVTec constructor arguments are :
- root – Root path of extracted MVTec anomaly dataset
- category – bottle
- task – Classification
- val_split_mode – No validation data is available we need to use synthetic data
- image_size – Images resized to 256 x 256
- train_batch_size – training batch size
- eval_batch_size – evaluation batch size
- num_workers – Number of workers
Next, we need to initialize a model and engine. Here we are using the Padim model for the demo.
 #Model and engine
model = Padim()
engine = Engine()
Train the model by calling the engine.fit method.
# Train the model
engine.fit(
        datamodule=datamodule,
        model=model,
    )
After the training, a results folder will be created and the trained lighting model will be saved F:\demo\anomalydetection\results\Padim\MVTec\bottle\v0\weights\lightning\model.ckpt. We will use this model path in the next steps.
The full source code of the training is available here (train.py) .
Test the trained model
To test the model we need a datamodule, model, and engine.
 test_results = engine.test(
        model=model,
        datamodule=datamodule,
        ckpt_path=r"F:\demo\anomalydetection\results\Padim\MVTec\bottle\v0\weights\lightning\model.ckpt",
    )
    print(test_results)
Test output as shown below with image_AUROC and image_F1Score. The full source code of testing is available here (test.py).
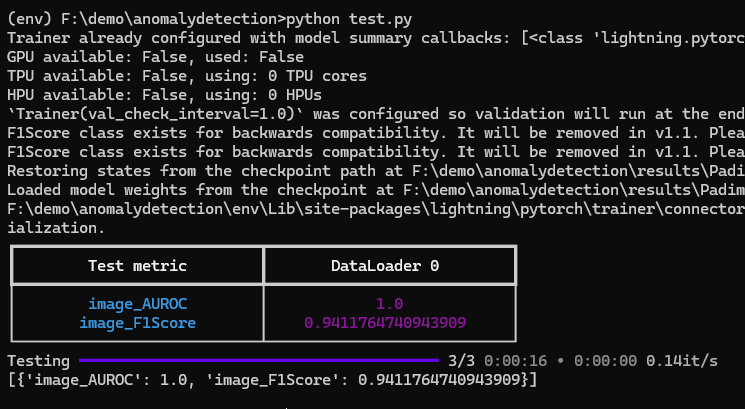
Metrics
The following metrics are used image_F1Score and image_AUROC.
F1 Score
The F1 score is a measure of the performance of a classification model, combining precision and recall into a single value. It is the harmonic mean of precision and recall. It ranges from 0 to 1, with higher values indicating better performance.
Precision tells us how many of the predicted positive cases are actually positive. It is a measure of the accuracy of the positive predictions. For example, high precision is essential in spam detection.
Recall indicates how many of the actual positive cases were captured by the model. It measures the model’s ability to identify all relevant cases. High recall is crucial in scenarios where missing a positive case is costly. medical diagnosis, failing to identify a disease can have serious consequences.
AUROC
The AUROC (Area Under the Receiver Operating Characteristic Curve) metric evaluates a binary classifier’s performance. It measures the area under the ROC curve, which plots the true positive rate against the false positive rate at various threshold settings. A higher AUROC indicates better model discrimination between classes.
For more details about Anomalib metrics here.
Export model to OpenVINO
We can export the model to OpenVINO for faster inference on Intel hardware.
openvino_model_path = engine.export(
        model=model,
        export_type=ExportType.OPENVINO,
        export_root=r"F:\demo\anomalydetection\models",  # OpenVINO model will be saved here
        ckpt_path=r"F:\demo\anomalydetection\results\Padim\MVTec\bottle\v0\weights\lightning\model.ckpt",
    )
print(f"OpenVINO Model saved to {str(openvino_model_path)}")
The OpenVINO model will be exported to “F:\demo\anomalydetection\models” directory.
Full source code of OpenVINO export here (ov_export.py).
OpenVINO model inference
Now we do inference on saved model as shown below:
from typing import Any

from anomalib import TaskType
from anomalib.data.utils import read_image
from anomalib.deploy import OpenVINOInferencer
from anomalib.utils.visualization.image import ImageVisualizer, VisualizationMode
from PIL import Image


def get_predictions(
    image_path: str,
    metadata_path: str,
    model_path: str,
) -> Any:
    image = read_image(path=image_path)
    inferencer = OpenVINOInferencer(
        path=model_path,  # Path to the OpenVINO IR model.
        metadata=metadata_path,  # Path to the metadata file.
        device="CPU",
    )
    predictions = inferencer.predict(image=image)
    return predictions
The get_predictions functions will predict the result. Let’s test a broken bottle image.
if __name__ == "__main__":
    predictions = get_predictions(
        r"F:\demo\mvtec_anomaly_detection\bottle\test\broken_large
if __name__ == "__main__":
predictions = get_predictions(
r"F:\demo\mvtec_anomaly_detection\bottle\test\broken_large\000.png",
r"F:\demo\anomalydetection\models\weights\openvino\metadata.json",
r"F:\demo\anomalydetection\models\weights\openvino\model.bin",
)
0.png",
        r"F:\demo\anomalydetection\models\weights\openvino\metadata.json",
        r"F:\demo\anomalydetection\models\weights\openvino\model.bin",
    )

From the above, we can see that the image is anomalous(82%) in nature. Finally, test a normal image.
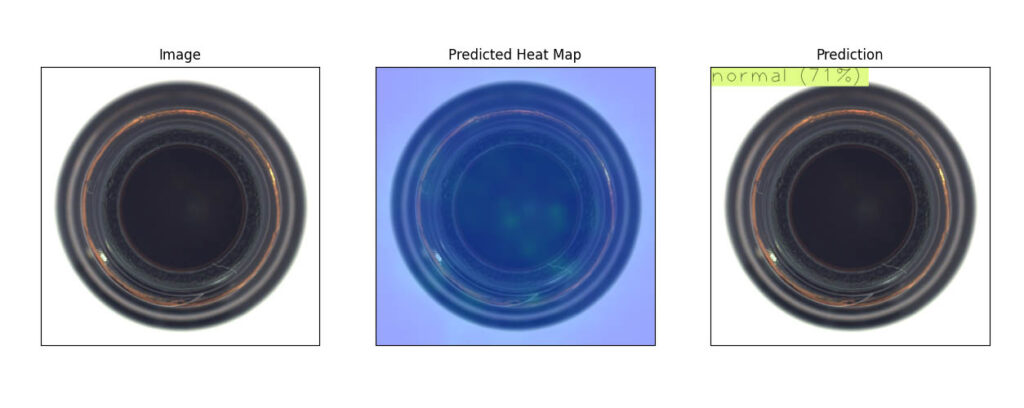
Full source code of the OpenVINO inference and visualization here (ov_infer.py).
Conclusion
In conclusion, using anomalib we can easily create anomaly detection model. OpenVINO inference helps to speed up inference on intel hardware. The full source code is available as a GitHub repo please check it out.